Indiana Historical Society Museum - Part 2
Welcome back to Part 2 of the Indiana Historical Society Museum!
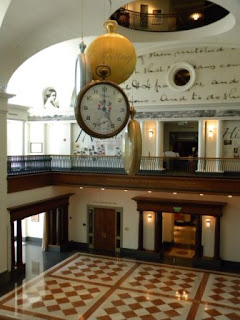
I wanted to start off with this photo of the beautiful main lobby. I love those giant pocket watches hanging down. It's a great tie-in to the "You Are There" exhibit theme.
Now this is the exhibit that I got all giddy about. I really couldn't wait to share it with you!
Conservation and Preservation
This exhibit talks about what conservation and preservation are, why they're important, and how it's done. I can't begin to tell you how much I loved this exhibit. This is one of those "behind the scenes" type of things that you usually don't get to see in museums, but this exhibit throws open the doors and tells you how it's done. Just completely awesome with a capital A!
Besides these signs explaining the importance of preservation and conservation, they had a computer available where you could research various aspects of those things through their Pinterest board which included pictures and videos from youtube. We watched one video that explained the process of marbling paper like what you see in old books for the end papers. That was so neat and a great use of technology in an exhibit!
Now we're getting to the really exciting part!!! Eeeeek! Allow me a moment to compose myself... Haha!
So, this wall was super cool. It had various materials mounted and they encouraged you to touch it. You could clearly see the damage the dirt and oils from your skin (and others' as well!) cause the materials. This is such an important concept for people to understand when touching "old things" like books, textiles, artifacts, etc. Your skin oils can do a lot of damage!
THEN, just down the hallway was - their conservation lab!! *geeky squeal!* It actually brought back a lot of memories of my internship in the archives at my alma mater Utah State University. We didn't have those fancy blue vacuum tubes attached to the ceiling, but a lot of the other stuff I recognized. It's so neat that you can watch them at work, though when we were there, there wasn't any one working.
Then, the absolutely most coolest part ever, was that they had a great activity for the kids. They got to repair paper! And not with Scotch tape! haha! But the correct, archival way. Man, this brought back memories too. The woman gave us paint brushes, a bone folder, a damp sponge, rice paste, rice paper, and an "old" piece of paper that we got to tear and then repair. Oh man, this was so cool. You may not be able to tell, but I was really, really wishing I could have had a project mat all to myself. haha! My kids had fun repairing the paper though. :-)
This part of the exhibit was really interesting. The archives found a picture of this man that had all the classic damage that could be done to old paper and used it as a learning tool. How amazing is that? You can see the touch screen below where you could see the process of damage and what likely caused the different damages. There was a time progression of the damage as well which was fun to watch.
I really like this cut away of the details of how a sewn book is bound. Very cool educational tool!
One of my favorite experiences from my archives internship was being able to completely rebind a book. I had wanted to use the book loom, but my manager didn't offer, so I asked special permission to rebind a personal book of mine - a U.S. History textbook from the 1880s. I got to take it apart, sew it and bind it. Through sewing it, I found out my book was missing pages! It was such a rewarding experience and it's something I still have. I loved it and have seriously considered getting myself a book loom. But really, I already have way too many hobbies. haha!
This last thing was a great use of a window. This part of the exhibit talked about watermarks in paper. Each little cut-out window is filled with a paper to showcase its watermark. So awesome.
The very last thing that totally sold me on this museum being the most awesome, spectacular museum ever was their gift shop. Yeah, it was a typical museum gift shop... except for the fact that they sold conservation materials!! I'm not kidding! Rice paste, rice paper, archival boxes, Mylar sleeves, bone folders... oh my gosh. I almost freaked out in a big way when I saw that. hahaha! Needless to say, I went home with an archival box and a huge stack of Mylar sleeves. I wish I had an excuse to buy all the other paper repair stuff, but my husband was already looking at me like I was weird to get so excited about Mylar sleeves. Well, my 1940s magazines and V-Mail are happy and safe in their new little homes now!


